Showing posts with label recipies. Show all posts

Monday, June 30, 2014

Mashed Smashed Potatoes

Last night I needed a quick side dish, and since I was too lazy to go to the grocery store all I had was about 15 fingerling potatoes. The hubs wanted baked potatoes, but with these tiny guys that just wasn't going to happen. So I went with my version of mashed/smashed potatoes.


First, I boiled the fingerling potatoes until soft. Once they were easily poked with a fork I drained them, and put them on a sheet pan. I drizzled them with EVOO and set about smashing them. I've seen them done with a potato masher and a fork, but I went straight for the meat tenderizer. Because it was on the top of the drawer and I was too lazy to keep digging.


If the potatoes were small they stuck a little bit, and I just used a knife to pop them off of the meat tenderizer thing.
 
Once they were all smashed, I sprinkled them with salt and pepper. In a bowl I put two tablespoons of butter and grated up three cloves of garlic and melted that in the microwave.  Once it was all melt-y and mixed, I drizzled a bit of the garlic butter over each potato and popped them into the oven at 400 degrees.
 
 
They took about 30 minutes to get nice and crispy on the edges. Once they were, I pulled them out and put a little bit of cheddar cheese on top of each potato and popped it back into the oven to melt.
 
 
I served mine with BBQ chicken and the hubs was devouring them, which is always a good sign.
 
Now, I have to go to the store otherwise its cereal for dinner tonight!
So tell me, what are your favorite easy side dishes?


Wednesday, March 19, 2014

Easy Herb Stuffed Chicken

The other night for dinner I wanted something relatively healthy but I also wanted something that didn't taste healthy. I had seen one too many Olive Garden commercials that day and was craving something Italian.
 
I think I've told you all before I married the pickiest husband on the planet, so sometimes finding something new to make can be a bit iffy.  I had a really yummy looking stuffed chicken on my pinterest board, but I knew stuffing it with cheese would not sit with hubs. But I was intrigued enough to come up with my own stuffed chicken, sans cheese.
 
 
Ingredients:
4 thin sliced chicken breasts (about 1/4 inch thick)
Fresh Rosemary- about 1 tablespoon
Fresh thyme- about 1 tablespoon
Garlic- I used four cloves
1 Tbsp Butter
Panko Bread Crumbs
Egg
Parmesan Cheese
 
1. Start by chopping up the rosemary and thyme. Place into a small bowl and grate in fresh garlic. Add butter and microwave for 15-30 seconds, just enough to melt the butter.


2. If you have thick chicken breasts, place them between two sheets of parchment paper and pound them to an even thickness around 1/4 inch thick.  Spread the garlic/herb/butter mix onto one side of the chicken breast.
 
3. Roll up the chicken, keeping the herb mix in the middle.
 
 
4. In one bowl beat together two eggs. In a separate bowl put some Panko bread crumbs mixed with about 1/2 cup of parmesan cheese.


5. Dip the rolled up chicken into the egg, then coat in breadcrumb/cheese mixture. I also threw some leftover thyme and rosemary into the breadcrumbs just to spice them up a bit. Make sure to really coat the chicken, including the edges.
 
6. Place into a greased baking dish.  Bake at 400 for 20-25 minutes or until chicken is no longer pink.
 
 
That's all she wrote!
 
I ate mine with green beans (yes they were canned, don't judge me). The hubs had his with buttered noodles. We also had bread, but truth be told I was so full from the chicken I didn't even eat mine.  I made four chicken breasts and the hubs ate two and a half of them. It was that good.


Do you have a fun stuffed chicken recipe I should try? Leave me the link and I promise to check it out!


Monday, January 13, 2014

Easy BBQ Chicken Pizza

As Superbowl Sunday approaches there really cant be too many good game day foods floating around on the internets, right?
 
 
This is one of those foods. The hubs devours it, I love it and even the two year old asks for more. Oh, yeah, its easy too.
 
Ingredients:
1 ball of dough
1/4-1/2 pound shredded chicken breast
3 strips of ready bacon
2 cups of shredded cheddar cheese
BBQ sauce of your choice
 
First- I had to defrost my dough. I used a brand called Rhodes that comes in a bag of three frozen loaves.  To defrost I simply pulled it out of the freezer, wrapped it in plastic wrapped sprayed with some PAM and let it do its thing. It took maybe three hours.  If you don't want to use frozen go to a local pizza shop and pick up a ball of dough, or make your own in a bread machine.
 
 
Next- I sprinkled the countertop with corn meal and rolled my dough out to the size of the pan. I actually rolled it over and then let it sit for 10 minutes on the pan before I par-baked the crust, so that it had all of its shrinking up out of its system. I used the extra edges I cut off to twist into some breadsticks for the toddler.  Before shoving it into a 400 degree oven I made sure to poke holes in the dough with a fork to keep it from getting large air bubbles all over the crust.
 
 
Let it par bake for 10 minutes. This is the secret to get the crust nice and crispy.  Once it comes out, I spread on my sauce which was a layer of Sweet Baby Rays BBQ sauce.
 
 
Then it was time to get the chicken out of the liquid it was poaching in (takes about 10 minutes) and shred it up.  I just used a chefs knife and sort of diced/crushed/chopped it all up. If you have chicken strips, those work too or a rotisserie chicken that you shred would also work just fine. Once it was in nice bite sized pieces, I tossed it all in a healthy dose of BBQ sauce.
 
Before putting on the chicken I cut up three strips of ready bacon and sprinkled them over the crust.
 
 
Because bacon makes it better, duh.  Then add on your layer of chicken, making sure to spread it evenly over the crust.
 
 
Then cover the whole thing in a healthy dose of cheddar cheese and pop back into the oven for another 10 minutes until its melted and bubbly.
 
 
 The thing I love the most about this is you can make it as easy or as gourmet at you would like. You can use pre-made dough, sauce, and a rotisserie chicken and you have very little prep involved. Or you can make your own BBQ sauce, dough and cook the chicken from raw. Whichever you prefer! Either way, its tasty and the perfect football food.
 
Tell me, what's your go to game day meal?


Thursday, November 7, 2013

Parmesean Crusted Chicken Tenders

Some nights call for comfort food- like nights where it gets dark at five fifteen and the cold of winter starts to set in.  One of my favorite semi quick comfort foods to make are definitely chicken tenders. Easy and versatile, once you get the recipe down you can make it a bunch of different ways.
 

Tonight- it was quick chicken parmesan.
 
Ingredients:
1 lb boneless skinless chicken tenders
1 cup bread crumbs
1 cup parmesan cheese
two sprigs of fresh rosemary
1 tablespoon of Italian seasoning
1 teaspoon of thyme (if you have fresh, use that- I just didn't)
garlic powder
salt
pepper
 flour
1 egg beaten with water
vegetable oil
 
 
1. Salt and pepper the chicken tenders and trim off any nasty bits.
 
2. Set up an assembly line that consists of a scoop of flour seasoned with salt and pepper, the egg beaten with a bit of water. In the third pan mix the breadcrumbs, cheese, spices, and chopped up fresh herbs together.


3. Now comes the time to bread the chicken- use one hand for the wet and keep one dry. It prevents gummy fingers. First dip the chicken in the flour, then the egg, then roll it in the bread crumbs and pat them on to coat the chicken.  Once they are coated let them sit for a few minutes to allow everything to stick.  I just leave them on the cutting board until the oil gets hot.


4. Put about an inch to an inch and a half of oil in a pan and heat it over medium heat.  Once the oil ripples, it should be hot enough. You can test it by dropping a little piece of the bread crumb mix in and see if it starts to bubble.  Put about three chicken tenders in the pan at a time, allowing them to cook for five to six minutes turning if needed.  If they get very brown very fast, your oil is too hot.


5. Heat the oven to 350 degrees. Place a cooling rack over a foil lined cookie sheet and after the tenders cook for five to six minutes remove them and place them on the cooling rack and place them in the oven.  It keeps them warm while you're cooking the other batches and makes sure if they need a minute or two more to cook through you're good to go. As you finish more batches, add them to the batch already in the oven.


Once they have all cooked through you're good to go.  I usually serve them with tomato sauce, cheese and a side of pasta for a quick chicken parmesan. You can also serve them with roasted potatoes and veggies- just coat the potatoes with time and rosemary so the flavors carry through.  
 
I love this recipe because from start to finish it takes maybe thirty minutes, and if you use paper plates for the flour/egg/breadcrumb mix and line the pans with foil it makes for a quick clean up. Its also fun to play with different herbs in the bread crumbs, like crushed red pepper and garlic for spicy tenders or really any combo of flavors you'd like.  

 
Try them- you wont be disappointed!


Wednesday, July 24, 2013

Spaghetti Meatballs- and no, I did not forget the &.

 
The hubs is pretty picky- so its easy to get into a funk of eating the same things week after week and I REFUSE to be the Hamburger Monday, Pizza Friday people.  So I'm always looking for ways to change things up to kind of break him out of his usual favorites.
 
This is one of the ways I manage to make the hum-drum spaghetti a little fun and different.
 
 
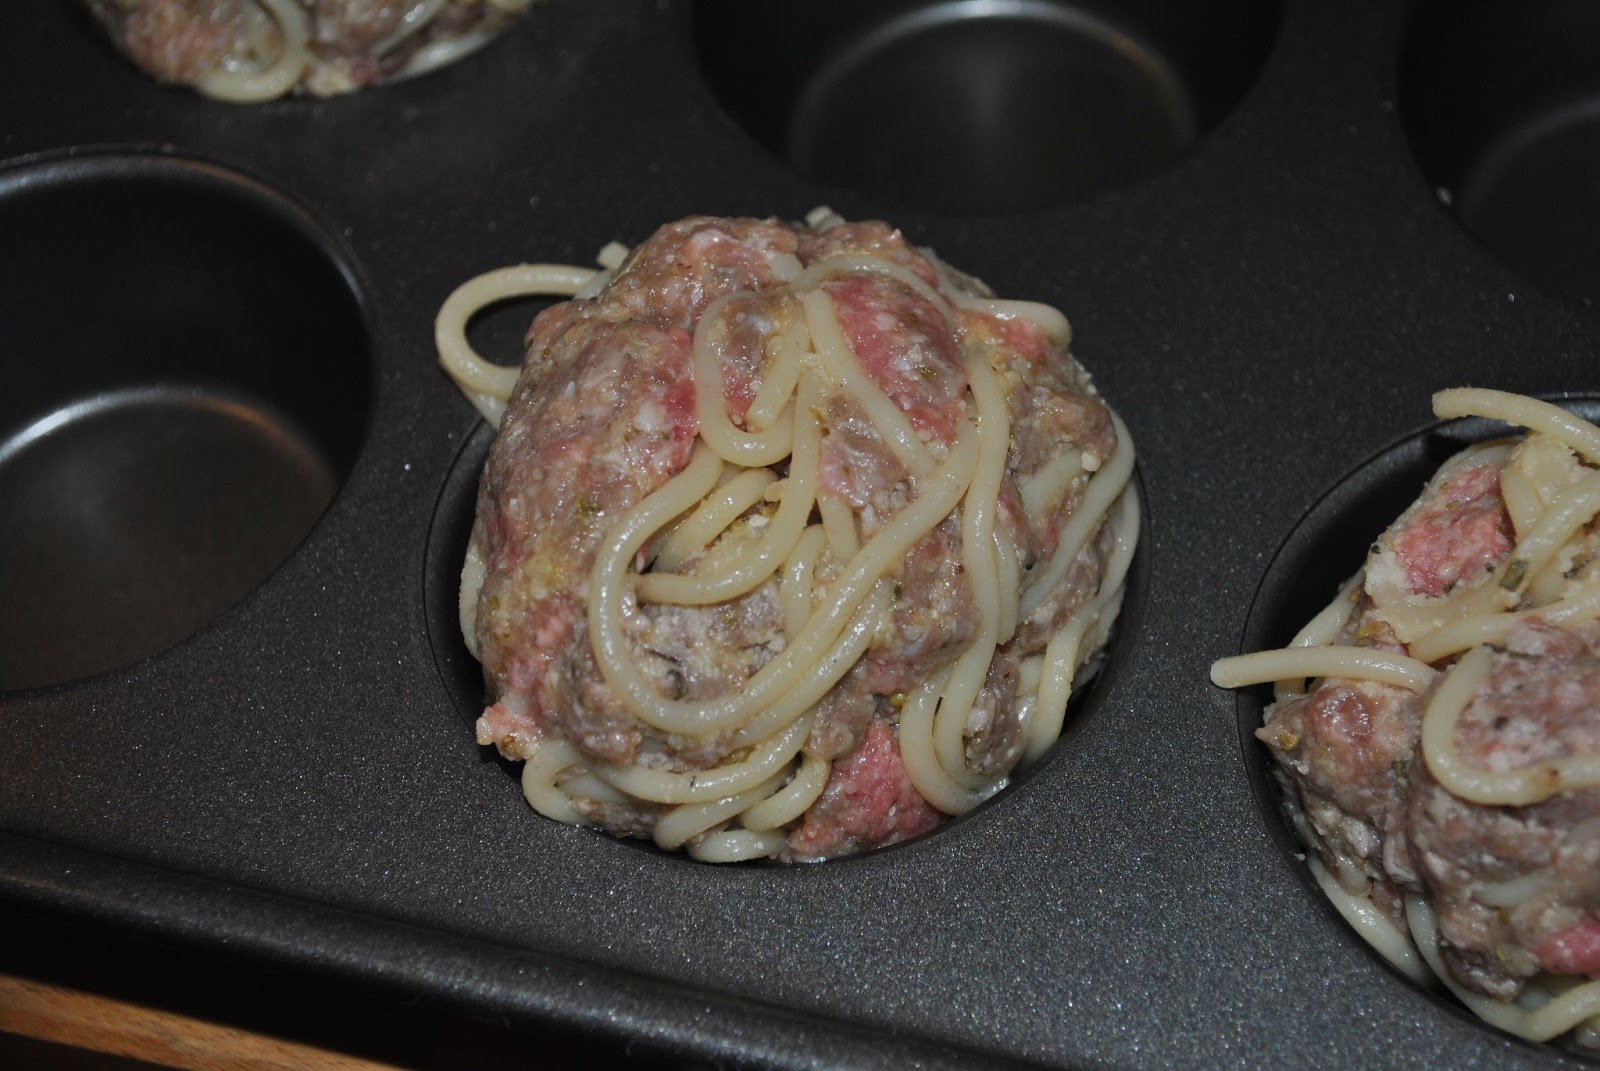
Enter spaghetti meatballs. A jumbo meatball with spaghetti mixed into the meatball.
 
Ingredients:
1/8 pound spaghetti or angel hair pasta- literally a handful about the size of a quarter.
1 to 1.5 pounds ground meat (you can use beef, turkey, or a mix of beef, veal and pork- whatever you prefer! I used ground beef because my turkey wasn't defrosted, but both are delish!)
 grated parmesan cheese (I toss in a couple of handfuls)
1 tsp powdered garlic
1 tsp onion powder
2 tbsp. Italian seasoning
1 egg
 
 
1. Cook the spaghetti, drain and allow to cool. I usually toss it in cold water for a few minutes to chill before I mix it into the meatballs so I don't scald my hands.  Once its cool I drain it again and put it on some paper towels to dry out a little. Too much water makes for bad meatballs.
 
 
2. In a mixing bowl toss in the meat, spices, egg, cooked spaghetti and cheese. I use the cheese instead of breadcrumbs, but you could do both if you like.  You can also play with the seasonings a bit to get them the way you like. Then dive on in there and get to mixing.
 
 
3. Spray a muffin tin with PAM to keep them from sticking, and form big meatballs. The goal is to make them the size of the opening on the pan, so they sit up off of the bottom. That way the fat drips out and away from the meatballs. 


4. Bake at 400 for 30-35 minutes, or until done inside. The spaghetti on the outside will get crunchy and stay soft on the inside.

5. While baking, make a quick tomato sauce. I have been told I make a mean sauce, but its really super simple. I don't really have measurements, I just put stuff in until it tastes right- but here is the general idea.
 
Ingredients:
2 cans of sauce
Extra Virgin Olive Oil
1-3 cloves of grated garlic
Italian seasoning
Onion powder
Chilli Pepper Flakes
Kosher Salt
Sugar
 
 
First, in a saucepan put a tbsp. of oil. Turn on medium low heat. Add a sprinkle of pepper flakes and grate the garlic into the oil. If you like mild garlic, use one clove if you like lots of garlic add more- its up to you. Allow the oil to warm up and infuse with the pepper and garlic flavors.
 
 
Once it warms up the garlic will start to speak to you and melt a bit. That's when you add in the tomato sauce, because you don't want the garlic and pepper flakes to burn. Stir the garlic and oil mix into the sauce to get the flavor spread out. 
 
Add in about half a palm-ful of Italian seasoning, and a quarter palm-ful of kosher salt. Then I add in about 1/2 teaspoon of onion powder and a spoon of sugar to cut down the acidity of the tomatoes. I let that all come together and then taste to see what it needs and add it if it does. You can never take it out, but you can always add it later.
 
 
6. When the meatballs are done, pull them out of the oven and run a knife around the rim of the muffin cup and they'll pop right out.
 
 
7. Plate them up. You can either serve them on a plate with sauce and a bit of mozzarella cheese, or eat them like my husband does. He prefers to smash one between two slices of crusty bread with some sauce and no cheese. Both are delish. Mine is a bit lower carb, however.


Enjoy!


Monday, June 10, 2013

Grilled Rosemary Chicken Skewers

Its grilling season!
 
If your husband is anything like mine (and you live in a house without AC like we do), you cook everything you can on the grill in the summer months. I've learned how to do just about every inside oven meal on the grill, but this was a new one for me.  While I was browsing the aisles at the grocery store, without the tiny human, so of course I was taking my good sweet time- I saw these super long skewers of rosemary. I love rosemary on chicken, so I decided that I would attempt to make chicken ka-bobs out of them. If I failed, I would pretend that was never the plan and call it a day. I'm a woman who likes to hide the kitchen fails. This however did not fail at all.
 
All I did was cube up two chicken breasts, and put in on the skewers with some onion and garlic. I thought at first there was no way the stuff would go over the stem. But they were really woody and it was super easy to stick the stuff on the skewer.
 
 
After everything was skewered on, I spread some canola oil on the chicken so it wouldn't stick to the grill. To season the chicken, I tossed on some Montreal Steak Seasoning. If you've never used it, its basically salt, pepper and garlic all in one shaker. Pure genius and delicious to boot.
 
To go with, I made some quick rosemary roasted potatoes. Rachael Ray says if you cook with an herb, you should carry the flavors throughout the meal- which is why they also got a dose of rosemary and Montreal steak. I took petite red potatoes and cut them up, tossed them in the oil and seasonings. If I had more time (meaning I didn't start dinner until 5:40) I could have left the potatoes whole, but I cut them into quarters to speed the cooking time.
 
 
 Before the chicken went on the grill, the potatoes went into a preheated 450 degree oven to cook for 30 minutes.


 drool.

 
It ends up being a really pretty meal- one that you can totally entertain with because it takes no time but looks impressive. The chicken literally pulls right off of the rosemary and the flavor stays in. Pair it with some potatoes and some corn on the cob and you have a super easy summer meal.
 
Enjoy!


Monday, March 4, 2013

Take Out-Fake Out: Chicken Fried Rice

I have a love for cheep, good Chinese food. The hubs had never understood the deliciousness of a good order of Lo Mien leftovers after a good night out until about 5 years after we met. The only way I could get him to try it was that he lost a bet- but I got him hooked as well.  However, hes still very picky about what he orders and where he will eat it from. Recently the place we usually order from changed owners and went from good to horrible, leaving me to go without my favorite take out food. We both adore chicken fried rice, and Grayson boy will eat that for days -so on this cold crappy night that's what I decided to whip up for dinner.
 

Take Out Fake Out Fried Rice
 
4 cups COLD white or brown rice- that's the secret to really good fried rice, make the rice the day before if you can.
2 eggs
Canola Oil
Salt, Pepper
2 garlic cloves, minced or grated
1 small onion, diced
1 medium carrot, diced
2-3 TBSP Green Peas 
1 lb Chicken Breast, cut into small chunks
2-3 TBSP Soy Sauce (enough to coat)
2-3 TBS Teriyaki Sauce (enough to coat)
 
1. Heat a few tsp of oil in a large skillet or wok
2. Beat eggs with salt and pepper and cook eggs until done- scrambling as they cook
3. Remove eggs from pan and add 2-3 more tsp of oil
4. Cook chicken until no longer pink
5. Once chicken is done, add diced carrot, onion and garlic and cook for a few minutes.
6. After the veggies have softened a bit add in cold rice allowing it to cook for a few minutes with the chicken and veggies.
7. Add the cooked eggs, peas and the Soy and Teriyaki Sauce (add enough until all the rice has sauce on it, but its not sopping).
8. Stir, allowing sauces to cook into the rice for a 2-3 minutes or until everyone is nice and hot.
9. Eat hot and make extra for leftovers!

Grayson ate two servings all by himself- even if most of that ended up all down the front of him he still had a blast trying!


Monday, February 25, 2013

Philly Cheesesteak Sloppy Joes and Better Than Fries Baked Potatoes

For the past few days Ive been craving beef- but I wasn't sure what I wanted. I was browsing through the recipe file for my weeks menus and this seemed like just the perfect fit.  Its beefy, filling and delicious without taking too much time or effort. It was originally a Rachael Ray recipe- and I love that it takes less than 20 minutes to make almost as much as I love the way it tastes.
 
 
I pared them with a quick baked potato idea that I saw on Pinterest.
 
Philly Cheesesteak Sloppy Joes- adapted from Rachael Ray
 
Ingredients:
1 tablespoon extra virgin olive oil
1 pound extra-lean ground sirloin
1 medium onion, chopped
1/4 cup steak sauce
1 cup beef stock
2 cloves of garlic, grated
Montreal Steak Seasoning

Provolone cheese, shredded
 
 
In large skillet over medium-high heat brown the ground meat in about a tablespoon or two of olive oil, about 5-6 minutes. While its still pink season liberally with Montreal Steak Seasoning. Add the onion and garlic and cook for another 5 minutes, until the onion is tender.
 
 
 Stir in the steak sauce and beef stock, bring up to a bubble and cook for about 2 minutes to let the sauce reduce to a nice thick bubbly mix.
 
 
Spilt open your rolls and pop into the oven to toast. After a minute top the top half with the shredded provolone and let it melt.
 
 
Top the bottom half with the meat mixture and smush together and enjoy!
 
I served mine with a new recipe for a better than fries baked potato that Ive seen on Pinterest.  Super easy to make.
 
Scrub your potatoes and slice them super thin, almost the whole way through.
 
I found they cook better if every so often you take out a small chunk, so that the layers can open up like an accordion.
 
Season each individual slice with salt, pepper, a drizzle of olive oil and some butter and pop it into the oven at 425 for 40-50 minutes. The salt helps draw the moisture out and they get nice and crispy.
 
 
I feel like these would also be delish with some herbs smashed down in there too.
 
Enjoy!